Skeleton Tank Display
At last year’s IPMS Nationals I picked up a Vargas Models WWI Skeleton Tank kit and was excited to build it. But I wasn’t sure exactly what to do with it. It was a single prototype so it didn’t see combat. (More info here) When doing some googling, I found pictures of the tank on display at Aberdeen Proving Ground with a simple cover structure. I knew I had to make it.
CAD works begins!
I designed the entire base in Fusion. There were three components:
- Base – designed to look like concrete at the bottom and rusty, outdoor display metal on top.
- Uprights – Welded metal uprights
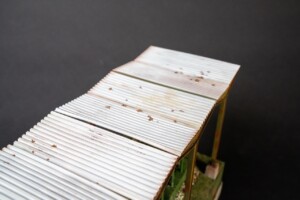
- Corrugated roof panels – individual panels that are created in scale (i.e. dang thin)
My first base design gave the model some space around the sides to help (in theory) give the diorama a sense of space, being in a big empty field. But turns out it just looked HUGE in person. So big it swallowed up the model.
So I designed in a much smaller (and fortunately singular print instead of having two halves) version.
This looked much better.
Adding textures and groundwork
I used AK Concrete texture paste to texture the base concrete area. This stuff is pretty great. Apply with a brush, let it dry at least 12 hours, then sand down the highlights and bam, great concrete texture. Be sure to give it some real cure time. Trying to manage this stuff without proper cure time will lead to disaster. It’s dry to the touch quickly, but rubbery for a while.
Second step was adding VMS Smart Mud 2.0. This stuff is fantastic. More info about it on WWI Trench Diorama write up.
Third step was adding the rocks (railroad ballast) and glueing them in place with diluted white glue.
First coat of paint
My first coat of primer was the primer red Touch n’ Tone spray paint. These paints lay down well and the red color was a great base coat for the chipping/rusting process. On top of that, I sprayed a heavy hairspray coat then several mottled tones of Tamiya green.
Chipping was done, removing much of the green paint. I don’t want green paint to be the primary look, I want this to be nice and rusty.
After this process, I used Mr Color clear coat to seal this work in, applied more hairspray and then airbrushed a Tamiya Red Brown on top of all this and chipped much of it away again.
Turned out pretty good for a rusty base coat!\
Starting work on the uprights
I realized quickly that working on the uprights was going to be a pain. There are 6 of them and they’re impossible to support without sticking them in something. So I banged out a quick template/stand in Fusion, printed it on the Bambu printer, and bam! Easy painting/holding tool!
I repeated the process for painting and chipping outlined above. I also added AK Concrete texture to the bottoms of the uprights.
Coming together!
With the corrugated roof panels printed, I could double check placement of everything. Looking good!
Plaque
The reference picture showed a concrete mounted description plaque near the tank, so I knocked out in Fusion. It’s hard to see because it’s DAMN small, but the text is legible. With magnifiers.
Problems with the model
As the base was getting closer to be wrapped up, I turned my attention to cleaning up the model and getting it ready for painting. Sadly, as with many Vargas Models kits, there were some significant print flaws. Youc an see the cross bars not mounting properly or even reaching where they should go. I’ve reached out to see about replacements, but since I’ve not heard back, I’ve moved on to trying to fix the issues myself.
Final images


